Showing posts with label Layout. Show all posts

Monday, October 8, 2018

October MKC challenge ~ Halloween

It's time for the October challenge for Miss Kate Cuttables!  

This month's challenge is HALLOWEEN!  Your project can be anything you want but it must be Halloween related and include a file from Miss Kate Cuttables.

The challenge starts today (10/08/2018) and runs through October 22, 2018.  The challenge can be found in the Miss Kate Cuttables Galleria on Facebook, here ~ Galleria.

Here's what I submitted for the challenge~
I had so much fun working on this one page layout.  Both files can be found in the store ~ Halloween Night and Haunted House.

Have fun working on your challenge submission, I can't wait to see what everyone makes! 

Thanks for stopping by.

Wednesday, March 12, 2014

My Hometown

Hi there, and happy hump day!! 

I thought I would post a layout I recently did for a crop I went too.  The challenge was to do a one or two page layout of your hometown.  

My hometown is West Palm Beach, FL, where I was born and raised for the first 40yrs of my life.  I have since moved to the mountains of East Tennessee but I'll always have Florida in my heart.  

Here's the two page layout I did ~ 


Here's the left side ~ The sun and palm tree are from Miss Kate Cuttables


Here's the right side ~ I found the State of Florida on the internet and did a trace and LOVE how it came out. 
 

 I didn't win anything with my layout but everyone learned some fun facts that they didn't know.  

Thanks for stopping by!!
 

Friday, February 3, 2012

My Cricut Craft Room 100 Cartridge Blog Hop

Welcome to My Cricut Craft Room's
100 Cricut Cartridge Blog Hop

You should have started at http://mycricutcraftroom.blogspot.com/  if not please start at the beginning


My Cricut Craft Room 100 Cartridge Hop


Be sure to visit Erica's Blog http://mycricutcraftroom.blogspot.com tomorrow for over 50 NEW projects that you did not see today....
Also make sure to follow Erica's blog so you will know when she has contests, prizes, challenges, swaps & special online coupons.

Currently she is running a Scrapbook & Card challenge over on her challenge blog and you can win a gift certificate to her webstore!  http://ericascraftroomchallenges.blogspot.com/
This Friday she will announce February's Scrapbook swap.... She has a swap each week and you have two weeks to make your project each month. There will be a card, scrapbook, tag, die cut and embellishment swap each month! http://ericascraftroomswaps.blogspot.com/

Don't forget to comment along the way on all of the blogs today and tomorrow to be entered to win the Cricut cartridge or K. Andrew Its Valentine stamp set that Erica is giving away today.
Winners will be announced on her blog on Tuesday!

If you get a chance please visit Erica's Webstore and enjoy 15% your total purchase this weekend.
Enter the code 15 during the third step of check out to see the discount.
She has everything crafty.... Cricut cartridges, adhesive, papers, stamps and so much more.....


My project today is a two page scrapbook layout.  
I used the Animal Kingdom, Bloom, Lyrical Letters and 
Snow Angel Cricut cartridges (Snow Angel is an Imagine cartridge).

This is how my layout started ...
 The borders on the bottom are cut with my CM Wavy Cutter.  The brown is 2" and the green is 1 1/2".

 This is the left page.  The tree is cut from the Bloom cart at 11".  The deer are cut from the Imagine Snow Angel cart at 3", the birds are at 3.5" (on the cart they are attached to the deer). The writing was welded on my Gypsy from the Lyrical Letters cart at 1". 

 This is the right page.  The tree is but from the Bloom cart at 10 1/2".  The deer are cut from the Imagine Snow Angel cart at 3", the birds are at 3.5".  The owl is cut from the Animal Kingdom cart at 2 1/2".

This is what the layout looks like before you add your pictures....

And this is the final layout with your pictures.  I used the same maroon 
paper to mat my photos as I used for the birds in the trees and the writing.  

I know this isn't your "typical" Christmas layout, but this hasn't been a "typical" Christmas for us as far as the weather goes.  As you can see from the photos we're in short sleeve shirts and these pictures were taken right before Christmas.  

I've decided to giveaway some blog candy on this hop, who doesn't like twine!!! 

(image is just for photo of Twine)
10 yards of 5 asst. colors
In order to win my blog candy you must do 2 things .. 
1.  Become a follower of my blog
2.  Leave me a comment 

I will draw the winner on Monday February 6, 2012


Thanks for stopping by today....your next stop should be Kym


Here is the lineup for today's hop ~

1.  My Cricut Craft Room   http://mycricutcraftroom.blogspot.com
13.  Erica’s Projects http://ericasprojects.blogspot.com

Sunday, January 8, 2012

My Cricut Craft Room 100 Cartridge January Blog Hop


My Cricut Craft Room 100 Cartridge Hop

Welcome to My Cricut Craft Room 
100 Cricut Cartridge Blog Hop
You should have started at My Cricut Craft Room, which is the beginning of the hop, 
if not please start at the beginning.

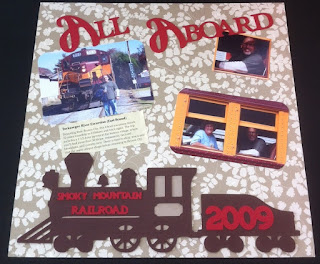
My project today is a scrapbook page; I used Ashlyn's Alphabet, 
Close To My Heart: Art Philosophy, Christmas and Birthday Bash.


I used my Gypsy to plan out the page and get my measurements straight.  
For the font at the top I used Ashlyn's Alphabet for the "A's" cut at 2" and then welded the rest of the words together from Close To My Heart: Art Philosophy at 1".
The train is cut from the Christmas cartridge at 4" high, but you need to remember that it's automatically going to come out 11" wide ~ which is fine cause I needed it to take up the whole page.  I used Birthday Bash for the writing on the train cut at .30", the date at 1".
It looks like I'm your last project on the hop ~ BUT WAIT... THERE'S MORE! (cheesy infomercial voice) ....... Make sure you stop off at http://ericasblogcandy.blogspot.com/ to see what the AWESOME blog candy is for today.  If you missed commenting on anyone's blog you might want to go back and make sure you leave some love, as that is how winners are picked for the blog candy!

If you get lost along the way here is the lineup for today's (Sunday) hop ~
Start ~ Http://MyCricutcraftroom.blogspot.com
Laura-
http://www.laurascraftsandmore.com/
Tracy-
http://scrappininthewoods.blogspot.com/
Lisa
http://www.allmadebylisa.blogspot.com/
Susan
http://craftingandbeyond.blogspot.com/
Ashley
http://theglamoroussideofscrapping.blogspot.com/  
Doris  http://mybugandmecreate.blogspot.com/
Janet  
http://janetscreativeworld.blogspot.com/
Liz  http://tryin2craft.blogspot.com/
Erica- http://ericasprojects.blogspot.com 

Conniehttp://conniecancrop.blogspot.com 
Sheila- http://2pawprints.blogspot.com/
Jamie-
http://jamiek711designs.blogspot.com/
Laurie- http://mincedpaper.blogspot.com/
Kathy
http://3spoileddogs.blogspot.com/
Kym  http://kimmyskards.blogspot.com.
Marji  www.fstampaholic.blogspot.com :
Sherri  http://squeakyscrapper.blogspot.com <~ME!
Blog Candy http://ericasblogcandy.blogspot.com

Friday, December 23, 2011

25 Days of Christmas ~ Day 23


Erica's Design Team

Welcome to Erica's Craft Room 25 Days of Christmas,
with 25 Cricut projects a day.  

Don't forget to stop by Erica's blog to see 24 more projects today....and every day in December.
http://mycricutcraftroom.blogspot.com 

Here is my project for today's theme which was Snowman....

What I used ~
~ I used the Birthday Bash Cricut Cartridge for the font and I used my Snow Angel Imagine Cartridge for the snowmen.  

Thursday, December 15, 2011

25 Days of Christmas ~ Day 15


Erica's Design Team

Welcome to Erica's Craft Room 25 Days of Christmas,
with 25 Cricut projects a day.  

Don't forget to stop by Erica's blog to see 24 more projects today....
and every day in December.
http://mycricutcraftroom.blogspot.com 

Here is my project for today's theme which was Trees...


What I used ~
~ I used Joys of the Season (trees & snowflakes), Lyrical Letters (all font, except the year) and Birthday Bash (the year) for my layout. Oops I left one out - I used the Creative Memories Art Philosophy cartridge for the ornament above the I in Christmas. 
~ I used White Liquid Applique for the snow on the trees.  I've used the Snow Marker before, but I think the liquid applique goes a little puffier. 

Thursday, December 8, 2011

25 Days of Christmas ~ Day 8

Erica's Design Team
Welcome to Erica's Craft Room 25 Days of Christmas,
with 25 Cricut projects a day.

Don't forget to stop by Erica's blog to see 24 more projects today....
and every day in December.

Here is my project for today's theme which was Calendars...

Just a little note about my calendar - I make a calendar for my mom every month that starts out like this with a pre-printed calendar.  When the month ends we take the pre-printed calendar off and mat a picture.  This is an easy way to prepare your scrapbook pages in advance. 

What I used ~
This layout was made with the Birthday Bash cartridge for the font, and Very Merry Tags for the bells.  I cut the bells twice to get the different colors because it didn't have a layering feature.
As you can see I used my trusty white gel pen on the letters and the bell ribbon. 

Monday, May 30, 2011

Sights of Yellowstone….

And we saw a lot!  I wish I could scrap them all!!

DSCN4685DSCN4686

The middle picture on the right side is a baby buffalo that was laying all by itself, it was soo cute. 

The paper used was all from Stampin Up! – Garden Green, Crumb Cake, Chocolate Chip, and Woodland Walk DSP.

Old Faithful

While in Yellowstone National Park we saw Old Faithful.  We didn’t get to see it erupt because it had just gone up right before we got there, and it was too cold to stand there and wait for it Smile

DSCN4683DSCN4684

The left side paper came from the local scrap shop and the right side was just some AC Cardstock I had that happened to match.  I used my cricut markers around the font which were cut from the “Birthday Bash” cartridge. 

Yellowstone National Park

After the Grand Tetons we entered into the Yellowstone National Park, which was beautiful!

DSCN4681DSCN4682

The paper I used is all from Stampin Up! – Chocolate Chip, Crumb Cake, Garden Green, and Woodland Walk DSP.

Grand Tetons

While on our road trip we went through the Grand Tetons National Park.

DSCN4679DSCN4680

My oval cutter is definitely my friend Smile  The font is from the “Birthday Bash” cartridge, which I just love cause it’s so clean and easy to read.  If you blow up the pictures you can tell that I used my cricut markers on the font, which I do often because the layering can get to heavy.  The paper I found at the local scrap shop.

Road Trip!

I’ve been doing a lot of scrapbook pages to document my California road trip last year, and here is my cover page.

DSCN4678

I used an assortment of papers and cartridges for this page.  The signs were made with my cricut gel pens.  The road trip sign was cut from the “Going Places” cartridge.  The road and the car were cut from the “Everyday Paper Dolls” cartridge.

Friday, May 6, 2011

Grand Canyon travel page

I’ve been trying to work on my scrapbook pages from two trips I took in 2009 and 2010, slowly but surely they’re getting done Smile.

I am so happy with the way these pages turned out, but I can’t take full credit for it – I have to give props to my buddy TINA for the inspiration.  I showed up at a crop to work on this page and realized that I only had one 12 x 12 sheet to do a two page layout…I’m sure I’m not the only one that has done that!  Tina looked at it and casually said “rip the one page you have and use the two pieces to tie the layout together”, I know I looked at her like she had two heads but once I realized what she was talking about I went to town.  I wish I could look at things and come up with ideas in a snap, and I know I would’ve never thought to rip my page! 

Anyway, here’s my layout and maybe it’ll provide inspiration to you Smile 

DSCN4638

DSCN4639             DSCN4640

Sunday, May 1, 2011

May Calendar Page

Well this one was tough for a theme, all I could think of were flowers and I just didn’t have my crafty mojo completely back to come up with something amazing for it.

May 2011

When I got this one finished I came up with some really cute ideas for it – isn’t that always the case!!

Friday, April 1, 2011

April Calendar Page

This page was done under EXTREME sickness .. LOL

I had such BIG plans for this page but was sooo sick when I was working on it I just couldn’t do it, in fact she almost didn’t even get a page for this month – here it is Smile 

April 2011

Saturday, March 12, 2011

Mount Rushmore layout 2009

From Colorado Springs we traveled to Wyoming and South Dakota, beautiful states Smile 

Here’s my Mount Rushmore layout ~

DSCN4535


Note:  I was going to post another layout I did of the Crazy Horse Memorial, but I realized that I put it on paper that says “Wyoming”, and it’s actually in South Dakota (DUH!).  My family all looked at the layout several times and no one caught that it was in the wrong state…geesshh!  Once I redo that layout I’ll post it, but trust me it came out really cute Smile

Colorado Springs 2009 layout

From our house we went straight to Colorado Springs to see our family.  Now I have to tell ya about this layout.  I bought the paper like I said in 2009, when we got back from our trip.  I LOVED the colors of the paper and this was going to be the first thing that I ever scrapbooked in my life so I wanted something kinda dummy proof. 

This is what the paper looked like when I started ~

DSCN4537_thumb

When I started working with my pictures and the paper I realized that I wanted to do a two page layout but I didn’t want both pages to say “COLORADO”, I wanted it to be a little more “personalized”.  I dragged out my bins of paper and got this crazy idea in my head about changing the paper, I know – ridiculous huh!  Here’s what I came up with ~

DSCN4532_thumb[1] 

 DSCN4533_thumb[6]    DSCN4534_thumb[7]

If you click on the 2 bottom squares you can see each individual page and what I did with it.  As you can tell from the original paper style it was a torn look and my Core’dinations paper really came in handy for that Smile.  My colors aren’t EXACTLY the same as the original paper. but I came pretty darn close.  I used liquid applique for the snow on the letters which came out great and gave the original paper a 3-D look.